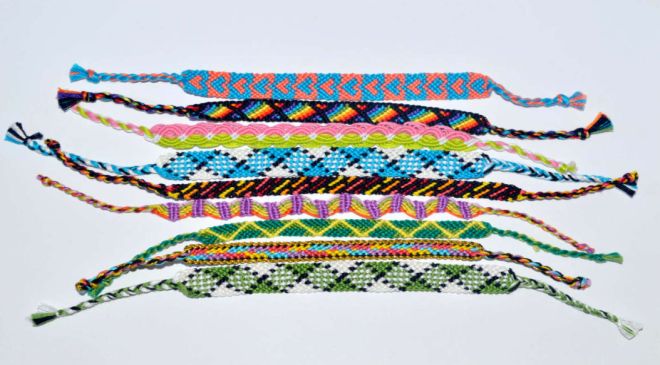
This list of friendship bracelet ideas will inspire you to get weaving and braiding.
Some things never go out of style and one of those things is friendship bracelets. Whether you’re reliving the summer camp days of your youth, prepping for the ultimate friendship bracelet exchange during Taylor Swift’s Eras Tour or you’re a do-it-yourself kind of girl with a passion for braiding, DIY bracelets stand the test of time. Friendship bracelets are a cute gift, a fun hobby and an impressive skill to have up your sleeve—or, on your wrist, actually. So how do you make a friendship bracelet? And what are some friendship bracelet ideas or DIY friendship bracelet patterns? You’ll find them here!
Read More:- How to Clean Oven Racks Quickly and Easily
Thankfully, this isn’t the bracelet-braiding of the 1990s. Nowadays, TikTok is a trove of cool friendship bracelet patterns, tutorials and ideas for those looking to DIY a gift for their BFF. No matter your friendship bracelet medium—be it Rainbow Loom, embroidery floss, beads, lanyard or rope—your bestie will appreciate any one of these 24 DIY friendship bracelets.
Also Read- Pre-Rinsing Your Dishes May Be A Waste Of Time
24 Friendship Bracelet Ideas
1. Beaded Rainbow Loom Bracelet
For bracelet makers that want a bit more of a challenge, this tutorial covers how to add beads to Rainbow Loom bracelets.
2. Woven Spiral Bracelet
The Spiral Bracelet and its traditional “4”-shaped weaving technique is a classic go-to style for DIYers.
3. Criss-Cross Weave Bracelet
This beautiful bracelet weaving technique results in a criss-cross, woven sort of effect and really pops using one solid color.
4. Woven Arrowhead Bracelet
The arrowhead technique results in a pretty kind of arrow-esque pattern that brings each color to a point, as if pointing in one direction.
Read More:- The Simple Tapping Trick To Prevent Air Bubbles In Bundt Cake
5. Rainbow Weave Bracelet
This weaving method looks great for rainbow looks because it creates a kind of twisty take on the spiral.
6. Woven Heart Bracelet
A super thoughtful way to show your BFF you love them is to weave tiny hearts right into your bracelet’s pattern!
7. Never Separation Bracelet
This bracelet design is rather simple, but its unique knot design symbolizes never separating.
8. Beaded Bracelet
Looking for an interesting way to bring beads into play? This twisting technique is simple and understated and most importantly, keeps the main focal point of the bracelet in place.
Read More:- What Is The Wordle Answer Today? #637 Hints & Tips For Saturday, March 18
9. Woven Fishtail Bracelet
Fishtail braids are timeless—whether in your hair or woven into a friendship bracelet.
10. Lanyard and Bead Bracelet
Looking to incorporate more than just one bead into your bracelet? Try this technique.
11. Wave Woven Bracelet
The woven wave technique has definitely been having a moment on TikTok.
12. Rainbow Rainbow Loom Bracelet
There are tons of different color combinations to try while making bracelets, but a rainbow scheme never goes out of style.
Read More:- 8 Weight Loss Secrets You’ve Never Heard Before
13. Woven Loop Bracelet
We’re not entirely sure what this technique is called, but it involves repeatedly putting your hand through each loop. You might have to watch the video a few times, but it’s pretty simple once you get the hang of it.
14. Woven Shell Bracelet
Beads aren’t the only accessory you can add to your DIY friendship bracelets. Little shells make a fun addition too.
15. Braided Rope Bracelet
Out of embroidery floss? No problem. You can fasten a thicker bracelet by weaving five thicker ropes together.
16. Slap Bracelet
It’s actually really easy to DIY a slap bracelet. It may not be a traditional kind of friendship bracelet, but in the 90s, slap bracelets reigned supreme. To make one of your own, you’ll need duct tape, a scissor, and measuring tape.
Read More:- Hello, Your Weekly Horoscope Is Here
17. Cobra Knot Bracelet
The Cobra Knot—also known as a Square Knot—requires three colors and the classic “4” technique involved in most patterns.
18. Loop Bracelet
Here’s a different way to weave friendship bracelets: Tie the two ends of the bracelet together, then tape it down. Take the three loops, weaving your fingers in the motion of up, up, around, and through. Pull the design all the way up to the top, and it should start to resemble a traditional braid after a few turns.
Also Read– What is business collateral?
19. Chevron Friendship Bracelet
You can’t go wrong with the chevron pattern on a friendship bracelet. To make the chevron pattern, separate the strings in half, then bring the two outer strings into the middle, and tie them. Repeat!
20. Beaded Flower Bracelet
Sure, you’ll need a lot of tiny beads for this, but just look at how adorable it turns out! Totally worth it.
21. Mystery Braid Bracelet
Have you ever wondered how to make a Mystery Braid bracelet like the ones sold in stores? Get your hands on a three-strand leather band, either encrusted or your standard band, then separate it so two strands are on one side, one on the other. Flip it, then braid it three times, flip it again, braid it three times, and flip it again. And repeat.
22. Braided Stitch Bracelet
This bracelet looks great with three or more colors and is characterized by larger chunks of each color in a diagonal pattern.
23. Rag Rug Bracelet
Rag Rug bracelets are great for when you have leftover bracelet twine scraps. Simply use whatever colors you have left over to create a 10-across pattern, then once you have the length, trim up the ends with a scissor.
24. Zipper Bracelet
To make a Zipper Bracelet, you’ll focus on creating a backward-forward knot. You’ll need three colors, two of which are longer than the third. Separate the two main colors to each end so that the shorter string (the white one, in this case) is situated in the middle. Now, backward-forward knot it up!