You may have a flatbed scanner at home or perhaps one of those “all in one” printer/scanner/copier machines, but did you know your smartphone’s camera can also double as a flatbed scanner?
It’s not only fast and convenient to scan something when away from your computer, but the quality is surprisingly good, thanks to much better camera sensors and smarter software.
Your iPhone or Android device is also ideal for digitizing old photos (in photo frames, albums or hanging on the wall), documents (menus, contracts, vaccination proof), notes, business cards, whiteboards and receipts (ideal for expense tracking or reimbursement) – and then storing those images for when you need them or sending them to someone else, if desired, via email or text.
Obviously, a “scan” really means taking a “photo” of what you’re pointing the camera at, but the technology can go beyond that.
Along with adding color and lighting correction to photos, today’s phones also boast “OCR” technology, which stands for “optical character recognition,” which can translate typewritten (and even handwritten) words into editable and searchable text.
Without OCR, when you scan, say, a newspaper article, it saves it as an image file on your phone, but you won’t be able to search for a keyword or text a friend specific sentences from within the article.
Here’s how to get going.
For iPhone users
Here’s how to use the Notes app to scan documents, photos and even add a handwritten signature using your fingertip.
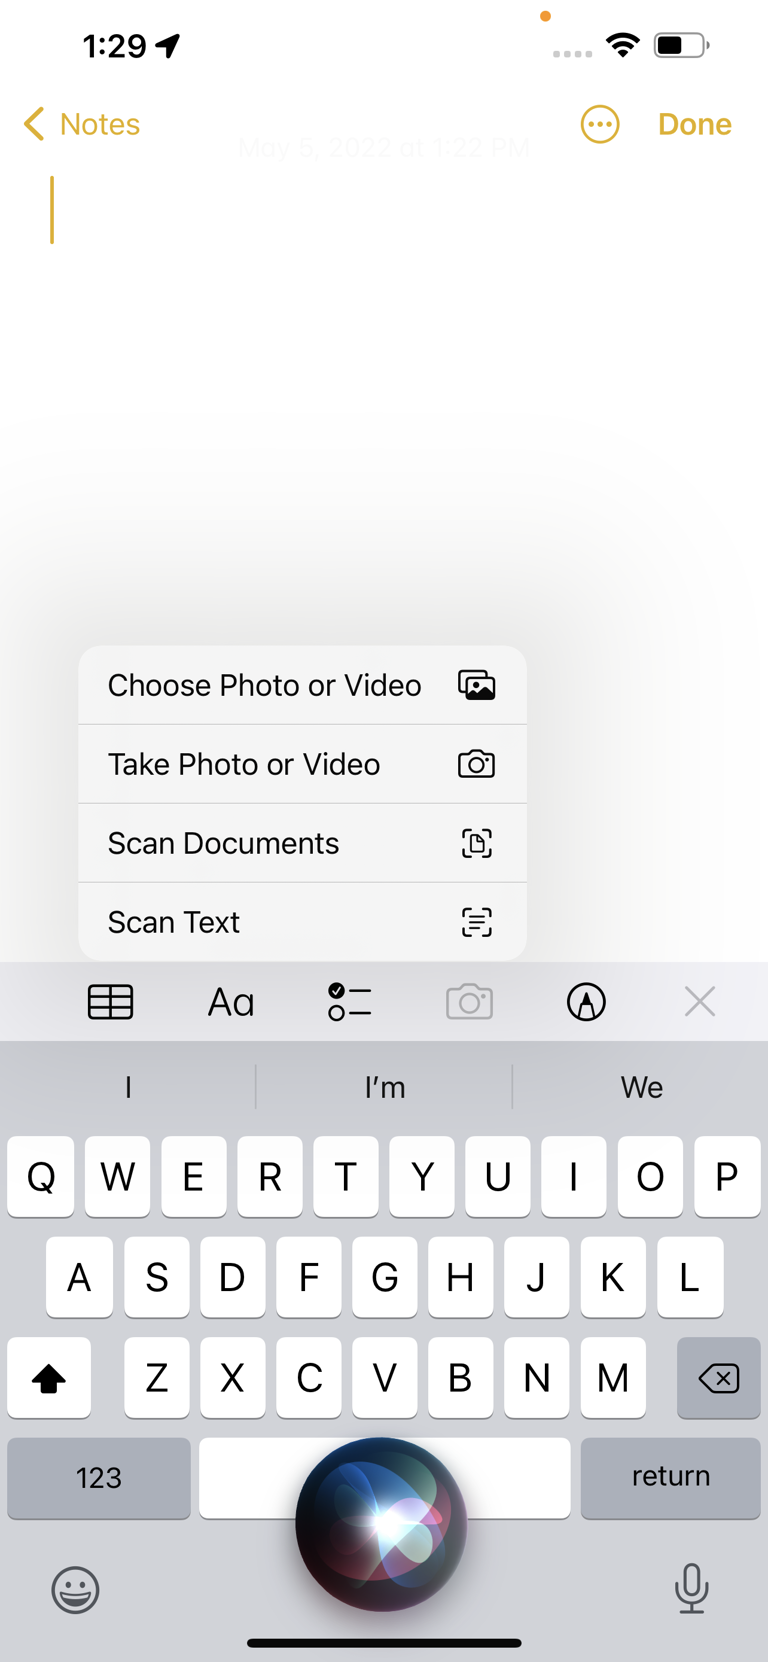
- Open the Notes app and create a new note (or select an existing one)
- Tap the Camera button at the bottom of the screen and select Scan Documents (yes, even if it’s a photo).
- Place whatever you’re scanning your document in view of the camera. If your device is in Auto mode, your document will automatically scan. If you need to manually capture a scan, tap the Shutter button to scan (or one of the Volume buttons).
- Drag the corners to adjust the scan to fit the page, then tap Keep Scan.
If you scanned a photo, you’ll also see some editing options at the bottom of your iPhone screen, such as cropping, tweaking the color and lighting, adding a filter (such as black & white) and more. Tap Done, followed by Save.
(But be aware this will stay in your Notes folder. If you’re digitizing a paper photo, it’s probably better to open the Camera and snap the photo and you will have many more editing and sharing options.)
How to sign a form using your iPhone
If the document you scanned needs to be signed, such as a waiver to swim in a public pool, follow these additional steps:
- Open the Notes app and then tap the document in the note.
- Tap the Share button, which is in the top right of your screen and looks like a square with an arrow pointing up. Tap Markup icon.
- Use your fingertip (or a stylus) to sign wherever you need to. You can use your fingers to zoom in and out the document, before you sign. There are different pen and marker options to select at the bottom of the screen, if you like.
- When you’ve finished, tap Done.
If you want to see this in action, I created a short Twitter video demonstrating how to do this
Use iPhone to digitize text
One of my favorite iPhone tricks is using the camera to immediately (and accurately) import text, as I demonstrate here.
For example, say you’re flipping through a cookbook and see something you want to make for dinner. Rather than manually typing out the ingredients you need to buy at the supermarket, hovering your iPhone camera above the recipe will immediately import the text into your Notes app.
Here’s how:
- Open the Notes app, tap to start a new note.
- Tap the Camera icon above the virtual keyboard and select Scan Text.
- Hover your iPhone camera above the text you want to capture (see the actual cookbook on the bottom third off the screen) and watch the words pop up in the Notes app (the top two-thirds of the screen).
- When you’ve finished, tap Done.
- How to digitize text with an Android phone

Android users, on the other hand, can use the Google Drive app built into the phone to scan documents, but use the Camera app to digitize text with OCR (see below).
If you don’t see the Google Drive icon on your home screen, which looks like a colorful triangle, simply search for the word “drive” and it’ll pop up.
How to use Android for regular documents:
- Open the Google Drive app and at the bottom right, tap Add (the large plus sign).
- Tap the Scan icon.
- Now take a photo of the document that you’d like to scan.
- To adjust the scan area, tap Crop (bottom right icon) and move the blue dots wherever you like (such as cropping out the top of a desk behind the document you’re scanning).
- If it’s a multi-page document you’re scanning and want them all to be part of one PDF document, tap the Add (“+”) symbol again to scan more pages or tap the Checkmark to upload the document to Google Drive. (Every Google Account starts with 15 gigabytes of free storage – shared across Google Drive, Gmail and Google Photos – but you can always pay for more or choose to download and save your scans to your phone’s memory, if you prefer.)
- To save the finished document, tap Done
How to digitize text using an Android phone
- Open your Camera app and point the phone at a document.
- As you do this, the phone will recognize it’s a document – like a contract or a business card – and add highlighted borders in yellow, along with a “Scan” icon on the right side of the screen.
- Select the words Tap to Scan and you’ll be prompted to draw the corners of the image to crop it. Tap the Save option.
If you don’t see this option, open the Camera app’s Settings and choose Scene optimizer, to ensure the “Scan documents” option is enabled.